
How to Increase Image Quality and Upscale Any Photo
A blurry photo can ruin a good moment. Maybe it is an old family picture. Maybe it is a product photo that looks fuzzy online. Whatever the reason, you want to increase image quality without spending hours learning software.
There are two real ways to do this. One needs no software at all. The other needs a program like Photoshop. This guide covers both, plus the mistakes that quietly make photos worse.
By the end, you will know exactly which method fits your situation. No guesswork, no jargon, just clear steps that actually work.
The Fastest Way to Increase Image Quality
If you just want a quick fix, here it is. Upload your photo to a free AI image upscaler, choose 2x or 4x, and download the result. No software, no signup, no watermark.
This works best for photos that are slightly low resolution or a bit soft. It will not turn a tiny thumbnail into a poster, and it will not fix a photo that is already badly blurred beyond recognition.
For most everyday needs though, this is genuinely the fastest way to increase image quality online free. Try PixConvio’s Upscale Image tool if you want to see this in action right away.
Quick checklist before you upload:
- Use the original photo, not a screenshot of it
- Pick 2x for small improvements, 4x for bigger jumps
- Download in the same format you uploaded
If your situation is more specific, like Photoshop, WhatsApp, or a PDF, keep reading.
Resolution, Quality, and File Size Are Not the Same Thing
Resolution, quality, and file size sound like the same thing. They are not, and mixing them up leads to the wrong fix.
What “image quality” actually means
Image quality is how much real detail a photo holds. If it looks sharp with visible texture, quality is high. If it looks soft or pixelated, quality is low, no matter how large the file is.
Why a bigger file size does not mean better quality
A file can be heavy and still look blurry. The blur gets baked in at the moment the photo was taken or compressed. File size and sharpness do not move together automatically.
Why KB size and image quality get confused
A bigger KB number does not fix blur. Compression shrinks KB size and often quality along with it. Upscaling raises resolution and can genuinely improve quality, but the KB size going up is a side effect, not the goal.
Here is the clearest way to see it:
| Term | What it actually measures | Common misconception |
|---|---|---|
| Resolution | Number of pixels in the image (width x height) | More pixels always means sharper |
| Quality | How much real detail and clarity the photo holds | A bigger file automatically means better quality |
| File size (KB/MB) | Storage space the file takes up | Increasing KB size improves quality directly |
Once these three are separated, the rest of this guide gets much easier to apply. Increasing image quality really means adding resolution and clarity, not just making the file bigger.
Which Method Should You Use?
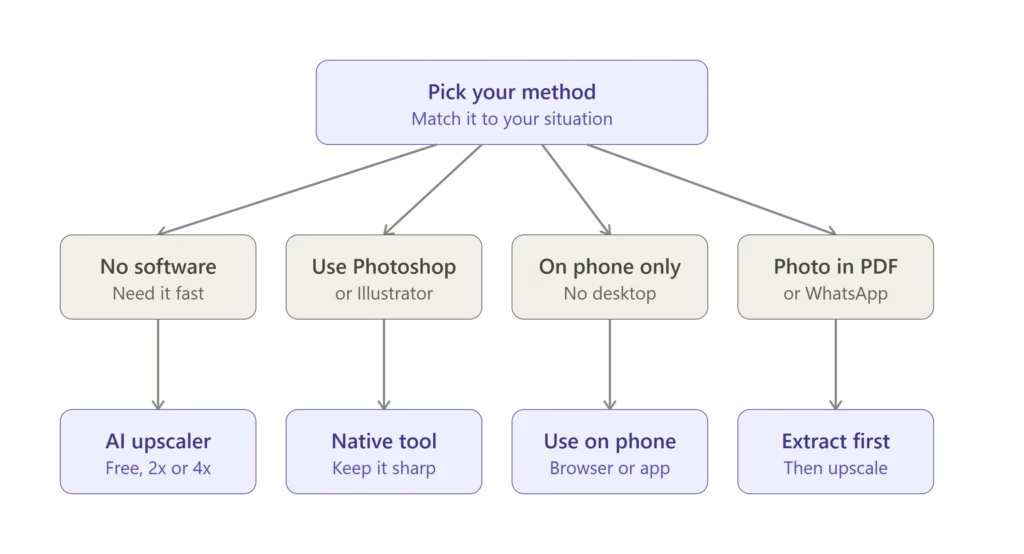
Not everyone needs the same fix. Your best option depends on your device, your software, and where the photo lives right now.
Pick the situation below that matches yours.
No software, need it done in seconds
If you just want the photo fixed right now, a free online image upscaler is your fastest route. Upload the file, pick 2x or 4x, and download it. No install, no learning curve.
You already own Photoshop or Illustrator
If you already work in Photoshop or Illustrator daily, you might prefer staying inside that workflow. Both have built-in resizing tools, though they handle quality differently than AI-based tools. Later sections cover this in detail.
You’re on a phone
Desktop software is not always practical on mobile. Apps like Picsart, or browser-based tools that work on mobile Safari and Chrome, cover this case better than desktop software ever will.
The image is inside a PDF or a WhatsApp chat
Photos trapped inside a PDF or sent through WhatsApp lose quality before you even start editing. These need a slightly different approach, covered later in this guide.
How to Increase Image Quality Online for Free
This is the method most people end up using, and for good reason. It takes under a minute and needs no download.
Step-by-step using an AI upscaler
Open the PixConvio Upscale Image tool. Upload your photo directly from your device.
Pick your scale factor, then click upscale. The tool processes the image right in your browser.
Download the result once it finishes. That’s the whole process, no account needed.
Choosing 2x or 4x correctly
2x doubles the width and height of your photo. Use this for small improvements or when the original is already decent.
4x quadruples both dimensions. Use this when the source image is quite small or heavily pixelated.
A quick way to decide:
- Photo looks slightly soft but usable: choose 2x
- Photo is small, blurry, or clearly low resolution: choose 4x
- Photo is already sharp and high resolution: skip upscaling entirely
Going bigger than needed does not add extra sharpness. It just creates a larger file with no real benefit.
Best format to upload and download
Upload in the format you already have. JPG, PNG, and WEBP all work fine with AI upscaling.
Download in the same format for photos meant for the web or social media. Switch to PNG only if you need a transparent background preserved.
This whole process is genuinely the simplest way to increase image quality without installing anything.
How AI Upscaling Actually Works
This part matters because it explains why some methods disappoint you. Once you see the difference, choosing the right tool becomes obvious.
Why stretching a photo makes it blurry
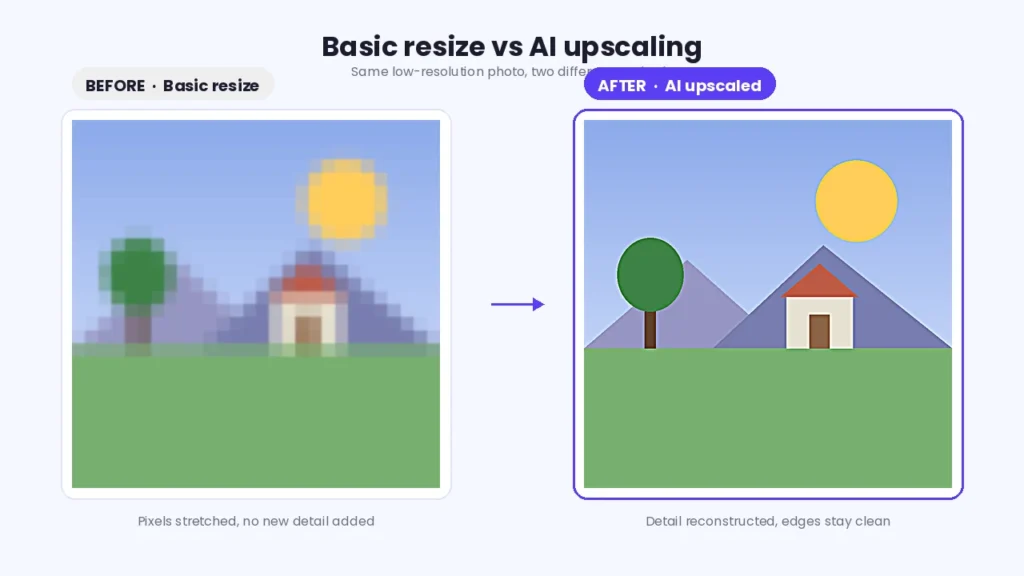
Old resizing methods work by copying and stretching existing pixels. There is no new information added, just the same pixels spread over more space.
This is why a stretched photo looks soft or blocky. The computer is guessing colors between pixels, not adding real detail.
How AI rebuilds missing detail instead of guessing pixels
AI upscaling works differently. The model has learned from millions of photos what edges, textures, and patterns typically look like.
When it upscales your photo, it uses that knowledge to reconstruct plausible detail. It is not copying pixels, it is predicting what the extra detail should look like based on the surrounding image.
This is the real reason AI results look sharper than a simple resize. The tool is rebuilding structure, not stretching what already exists.
AI upscaling vs old-school resizing, the real difference
Here is a simple way to picture it. Old resizing is like zooming into a photo on your phone, the image just gets bigger and blurrier.
AI upscaling is closer to an artist redrawing the photo at a larger size, using the original as reference. The result holds up because new detail was actually generated, not stretched.
How to Increase Image Quality in Photoshop
Photoshop gives you more control than any online tool. It also takes a bit more effort to get right.
Using Image Size with Preserve Details
Open your photo, then go to Image, then Image Size. Check the box for Resample.
Choose Preserve Details 2.0 from the dropdown menu. This option handles enlargement better than older resampling methods.
Increase the width or height, keeping the chain icon linked. Photoshop will scale both dimensions together automatically.
Move the Reduce Noise slider up slightly if the photo looks grainy after resizing. Around 30 to 40 percent usually works well.
Click OK, then save your file. Use File, then Export As if you need a different format.
Doing this in Photoshop CS6 specifically
CS6 does not have Preserve Details 2.0. It only offers the older Bicubic Smoother option.
Select Bicubic Smoother from the dropdown instead. It still works, just with softer results than newer Photoshop versions.
Apply a light Smart Sharpen filter afterward. This helps recover some of the crispness that CS6’s older engine misses.
Where Photoshop’s built-in upscaling falls short vs AI
Photoshop stretches and smooths existing pixels, even with Preserve Details turned on. It does not generate new detail the way AI models do.
This matters most on small or heavily compressed photos. Photoshop can only work with the information already in the file.
A quick comparison:
| Situation | Photoshop | AI upscaler |
|---|---|---|
| Photo is already decent quality | Works fine | Works fine |
| Photo is small or pixelated | Struggles, looks soft | Handles it much better |
| You need speed | Slower, manual steps | Faster, one click |
| You need full manual control | Yes, full control | Limited control |
If you already live in Photoshop daily, this method fits your workflow. If the photo is genuinely low quality, an AI upscaler will likely give you a sharper result.
How to Increase Image Size in Illustrator Without Losing Quality
Illustrator behaves differently from Photoshop because it deals with two very different file types.
Why vector files behave differently from photos
If your artwork is a vector, made of paths and shapes, you can resize it infinitely. Vectors have no pixels, so there is no quality loss at any size.
Select the object, then drag a corner handle while holding Shift. The shape stays sharp no matter how large you make it.
This only applies to true vector artwork like logos or icons. A photo placed inside Illustrator is not a vector, even if the file is an AI or EPS.
When to convert to a raster and upscale with AI instead
If you’re working with a photo or a raster image inside Illustrator, resizing it directly will blur it. Illustrator scales raster images the same way Photoshop does, by stretching existing pixels.
In this case, skip Illustrator’s built-in scaling. Export the raster image first, then run it through an AI upscaler before placing it back into your file.
This gives you a sharp result instead of a stretched, blurry one. Once upscaled, drag the improved image back into your Illustrator document at its new size.
How to Increase Image Quality in Lightroom
Lightroom is built for photo editing, not resizing, so this works a little differently.
Open your photo, then go to the Export dialog. Check the Resize to Fit option under Image Sizing.
Set your target width and height in pixels. Lightroom will scale the photo during export.
Set Resolution to 300 pixels per inch if the photo is meant for print. Use 72 for web or screen use.
Lightroom sharpens gently during export if you enable Output Sharpening. Choose Standard for most photos, or High for softer images.
Keep in mind Lightroom resizes using standard interpolation, similar to Photoshop’s older methods. It does not reconstruct missing detail the way AI upscaling does.
For a small resize before printing, Lightroom’s export settings work fine. For a photo that needs real detail added back, an AI upscaler will give you a better result.
How to Increase Image Quality in Picsart
Picsart is mobile-first, so this method works well if you’re editing from your phone.
Open the app and select your photo. Tap Tools, then look for the Enhance or HD Quality option.
Picsart applies its own AI enhancement automatically. Sliders let you adjust the strength if the result looks too aggressive.
Save the photo once you’re happy with it. Picsart exports at the new resolution automatically.
The free version limits export resolution and adds a watermark on some enhancement features. This is worth checking before you rely on it for anything final.
If you’re on your phone and Picsart isn’t available or the watermark is a problem, a browser-based AI upscaler works directly in mobile Chrome or Safari with no app needed.
Why WhatsApp compresses every photo you send
WhatsApp compresses every photo automatically to save data and speed up sending. This happens even if your original photo was high resolution.
The compression is aggressive. A sharp photo can lose noticeable detail the moment it’s sent as a regular photo message.
Sending as a document instead of a photo
You can avoid this compression entirely. Attach the photo as a document instead of a photo.
In WhatsApp, tap the attachment icon, then choose Document instead of Gallery. Select your photo file from there.
This sends the original file with no compression applied. The recipient gets the exact quality you started with.
The tradeoff is it won’t show as a photo preview in the chat. It appears as a file the recipient has to open or download.
Restoring quality after receiving a compressed photo
If you already received a compressed photo and the sender can’t resend it, you can’t fully recover what was lost. Compression removes real data permanently.
An AI upscaler can still help here. It won’t restore the exact original detail, but it can sharpen edges and reduce the blocky look compression leaves behind.
This applies the same way to WhatsApp Status photos. Status images go through the same compression, so uploading as a document isn’t an option there, but running the photo through an upscaler before posting helps it hold up better.
Increasing Image Quality Inside a PDF
Why images inside PDFs look blurry
PDFs often compress embedded images to keep the file size small. A sharp photo can look soft once it’s placed inside a document.
Scanned PDFs make this worse. The scanning process itself often produces low resolution images before any compression even happens.
Upscaling an image before placing it in a document
Extract the image from the PDF first if you need better quality. Most PDF tools let you save embedded images separately.
Run that extracted image through an AI upscaler before placing it back. This gives you a sharper result than trying to fix the image after it’s already inside the PDF.
If you’re building the document from scratch, upscale your source images first. Place the improved versions into the PDF instead of the original low resolution files.
This order matters. Fixing quality before placement always works better than trying to fix it after the image is already compressed inside a finished PDF.
Fixing Quality by File Format
JPEG and JPG specific notes
JPEG uses lossy compression, meaning it throws away some image data every time it’s saved. Opening and re-saving the same JPEG repeatedly makes this worse each time.
If your JPEG looks blurry or blocky, avoid saving over it again. Work from the original file if you still have it, then upscale from there.
Upscaling helps smooth out JPEG artifacts to some degree. It won’t remove them completely, but edges usually look cleaner afterward.
If file size in KB matters for your JPEG alongside quality, PixConvio’s JPG to KB tool handles that specific balance separately from upscaling.
PNG specific notes
PNG uses lossless compression, so it doesn’t degrade the way JPEG does with repeated saves. A blurry PNG is usually blurry because of the original photo, not the format.
PNG is the right choice when you need a transparent background preserved. Keep this in mind when choosing your output format after upscaling.
Larger PNG files are normal after upscaling, since more pixels means more data to store. If the resulting file feels too heavy, PixConvio’s compression tools can bring the size back down without undoing the quality gain.
Upscaling to 4K, 8K, and 16K
What these numbers mean in actual pixels
4K refers to roughly 4000 pixels on the long side. 8K means around 8000 pixels, and 16K means around 16000 pixels.
These numbers describe pixel count, not a guarantee of sharpness. A photo upscaled to 16K from a tiny source still won’t match a photo that started large.
Here’s what these targets actually look like starting from common sizes:
| Starting size | 2x result | 4x result |
|---|---|---|
| 500 x 500 px | 1000 x 1000 px | 2000 x 2000 px |
| 1000 x 1000 px | 2000 x 2000 px | 4000 x 4000 px (4K) |
| 2000 x 2000 px | 4000 x 4000 px (4K) | 8000 x 8000 px (8K) |
| 4000 x 4000 px | 8000 x 8000 px (8K) | 16000 x 16000 px (16K) |
Do you really need 16K?
Most everyday use does not need anything close to 16K. Social media, websites, and standard printing look fine well below that.
16K makes sense for large-format printing, like banners or billboards viewed up close. For a phone photo you want to post online, 2x or 4x is usually plenty.
Picking a bigger number than you need just creates a heavier file with no visible benefit. Match the output to where the photo is actually going.
Mistakes That Quietly Ruin Image Quality
A few habits cause more damage than people realize. Avoid these before you even open an editing tool.
- Saving and re-saving the same JPEG repeatedly, which compounds compression loss each time
- Upscaling a photo that’s already heavily compressed, since there’s little real detail left to work with
- Sending photos through WhatsApp or Messenger as regular photos instead of files, triggering automatic compression
- Choosing a format that strips transparency or color depth you actually needed
- Upscaling far beyond what the final use requires, wasting time and storage for no visible gain
- Screenshotting a photo instead of using the original file, which locks in extra quality loss
Fixing these habits first often matters more than any single tool you use afterward.
Frequently Asked Questions
Can you increase quality without losing anything?
Not perfectly. Some loss already happened if the photo was compressed or resized down earlier. AI upscaling can rebuild convincing detail, but it can’t recover data that was permanently discarded.
Does upscaling increase file size?
Yes. More pixels means more data to store, so the file grows even though nothing was added by choice.
What’s the best free image upscaler?
Free AI tools with no signup and no watermark tend to work best for casual use. PixConvio’s Upscale Image tool fits that description and works entirely in the browser.
Can I upscale the same image twice?
You can, but results rarely improve much on the second pass. The model already added the detail it could on the first run.
Does upscaling work on blurry photos?
It helps, but it has limits. Heavy blur from camera shake or poor focus can’t be fully reversed, though sharpening during upscaling often improves the look.
How Image Upscaling Works Behind the Scenes
Bicubic and Lanczos resizing, the older method
Traditional resizing methods like bicubic and Lanczos work by calculating new pixel values based on nearby existing pixels. They’re fast and reliable, but they can’t invent detail that was never captured.
This is why older resizing tools always look softer once you push past a certain size. There’s simply no new information to draw from.
How AI models like ESRGAN reconstruct detail
Models like ESRGAN are trained on huge sets of paired low and high resolution images. Through that training, they learn what real edges, textures, and patterns typically look like at higher resolution.
When given a new photo, the model applies that learned pattern knowledge to fill in plausible detail. The result holds up under scrutiny far better than simple pixel math.
Automating upscaling with Python
Developers can run models like Real-ESRGAN or waifu2x directly through Python for batch processing. This is common for photographers or businesses handling large volumes of images at once.
This route needs some coding comfort and a decent GPU for reasonable speed. For a single photo, a browser-based tool remains the simpler choice.
Free Online Tools vs Photoshop vs Mobile Apps
| Free AI upscaler | Photoshop | Mobile apps (Picsart, etc.) | |
|---|---|---|---|
| Cost | Free | Paid subscription | Free with limits, paid for full features |
| Max output | Usually 4x, some offer more | Unlimited, manual | Often capped on free tier |
| Watermark | None on most free tools | None | Sometimes on enhanced exports |
| Signup required | Usually no | Requires Adobe account | Requires app account |
| Speed | Seconds | Minutes, manual steps | Seconds |
| Best for | Quick fixes, casual use | Full creative control | Editing on the go |
Each option earns its place depending on the situation. A free upscaler wins for speed and simplicity. Photoshop wins when you need precise, manual control over every detail. Mobile apps win when you’re away from a desktop entirely.
Which Option Is Actually Best for You
If you just want a fast fix with no software, a free AI upscaler online is the simplest path. If you already work in Photoshop or Illustrator daily, staying in that workflow makes sense too.
For phones, a browser-based tool or an app like Picsart covers you without needing a desktop. For photos trapped in a PDF or sent through WhatsApp, extract the image first, then upscale it separately.
Whatever your situation, the goal is the same. You want to increase image quality without losing the details that made the photo worth keeping in the first place.
Try PixConvio’s Upscale Image tool if you’re ready to see the difference on your own photo.